Are you a concerned parent looking to secure your child’s future? Look no further than the NPS Vatsalya scheme. This government-backed investment plan offers a safe and lucrative way to save for your child’s future needs, be it education, marriage, or retirement.
If you’re ready to take the first step towards a brighter future for your child, this guide will walk you through the simple process of applying for NPS Vatsalya Registration online.
Steps to Apply for NPS Vatsalya Registration Online
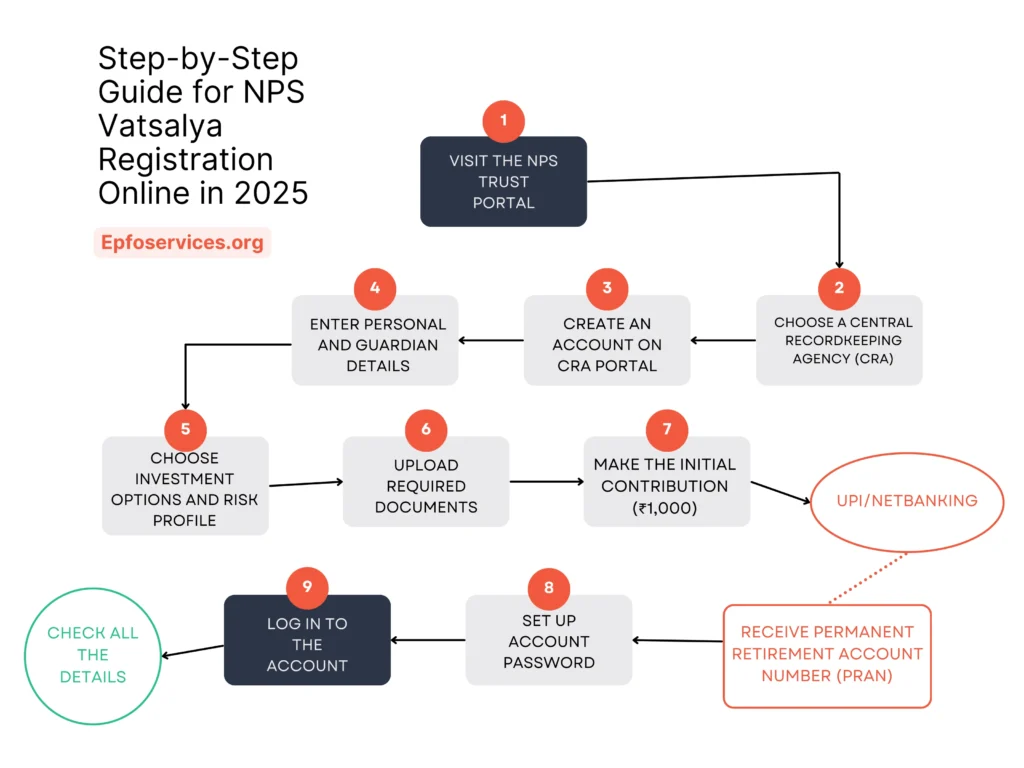
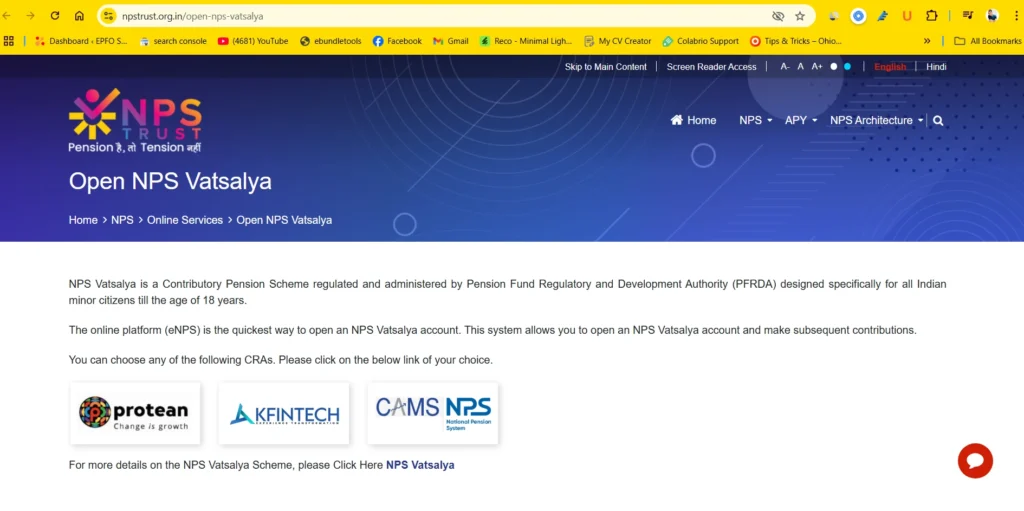
First open the official NPS Trust portal website.

Step 1: Visit the NPS Trust Portal
To apply online for the NPS Vatsalya scheme, select a Central Recordkeeping Agency (CRA) to manage your child’s NPS account. Popular CRAs include:
- KFin Technologies
- CAMS
- NSDL

Step 2: Choose a Central Record Keeping Agency (CRA)
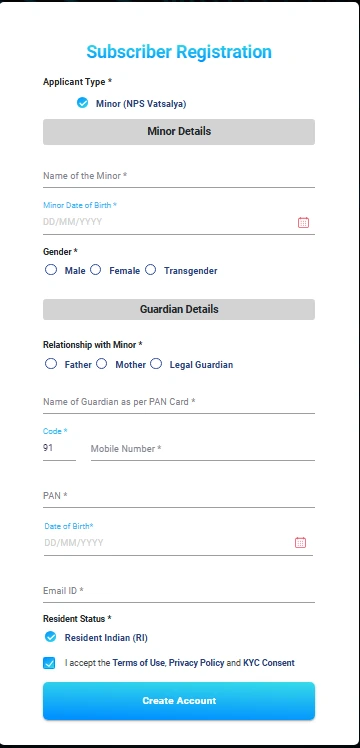
- Visit the CRA’s website. as a example you can take Kfintech.
- Click on → “New Registration” or “Sign Up”.
- Enter your child’s details (Name, Date of Birth, Gender).
- Enter your details as the guardian (Name, PAN, Address, Mobile Number, Email ID).
- Select your residency status:
- Check the “Resident Indian” box if you are an Indian resident.
- Uncheck it if you are an NRI.
- Verify your details using OTP.
Step 3: Create an Account on the CRA Portal
- Personal Details: Enter Personal Details → (Child’s Name, Date of Birth, Gender, Guardian’s Name, Guardian’s PAN, Guardian’s Address, Guardian’s Occupation, Guardian’s Income, Nominee Details – Name and Relationship to the child).
- Select Investment Choice :
- Account Type: The account type will automatically be selected as Tier 1.
- Investment Option: Select an investment option (Active or Auto).
- Pension Fund Manager (PFM): Choose a PFM to manage your child’s investments.
- Risk Profile: Select a risk profile (Conservative, Moderate, or Aggressive) to determine the asset allocation.
Note: Confused about Auto Choice, Active Choice, or Pension Fund Managers? Discover everything you need to know about NPS before you apply!
- Upload Required Documents:
- Upload your child’s birth certificate as proof of age.
- Upload the scanned signature of the guardian (should be in JPG format & size should be between 2kb and 2MP). You can use Image resizer.
Step 4: Make the Initial Contribution
- Minimum Contribution: Make an initial contribution of at least ₹1,000 or more you can do.
- Payment Methods: You can use net banking, credit/debit cards, or UPI to make the payment.
Step 5: Receive Your PRAN
After your successful payment, you will receive a Permanent Retirement Account Number (PRAN) via email and SMS on ZIP format with Figital PRAN card. This PRAN is a unique identifier for your child’s NPS account.
Step 6: Set Your Account Password
After receiving your PRAN, you need to log in using your PRAN and generate a new password. Once logged in, you will be able to view all the details regarding your NPS Vatsalya plan.
- Log in to the CRA’s portal:
- Click on the → Generate/Reset Password.
- Enter → your PRAN and other required details.
- Verify → your identity using OTP.
- Create a strong password.
- Log in: Use your PRAN and newly created password to log in to your child’s account.
Official Resources for Vatsalya Registration Online:
Additional Articles You May Find Helpful
Key Tips for NPS Vatsalya Registration Online
- Early Start: The earlier you start, the more significant the returns can be.
- Government Backing: NPS Vatsalya is a government-backed scheme, ensuring safety and stability.
- Tax Benefits: Investing in NPS offers various tax benefits.
- Flexible Investment Options: You can choose from different investment options to suit your risk appetite.
- Regular Contributions: Consider setting up regular contributions to maximize the benefits.
- Review and Update: Regularly review your child’s NPS account and update any necessary information.
By following these steps and tips, you can confidently apply online for the NPS Vatsalya scheme and secure your child’s future effectively.
Frequently Asked Questions About NPS Vatsalya Registration Online
What documents are required to apply for NPS Vatsalya online?
To apply for NPS Vatsalya online, you typically need the following documents:
Your child’s birth certificate
Your PAN card
Your Aadhaar card
A recent passport-sized photograph of your child
How do I choose a Pension Fund Manager (PFM)?
You can choose a PFM based on their past performance, investment philosophy, and fees. It’s recommended to research different PFMs and select one that aligns with your financial goals and risk tolerance.
What is the minimum initial contribution for NPS Vatsalya?
The minimum initial contribution for NPS Vatsalya is ₹1,000.
Can I make additional contributions to my child’s NPS Vatsalya account?
Yes, you can make additional contributions to your child’s NPS Vatsalya account. However, there are certain guidelines and limits to follow.
What happens if I want to withdraw money from my child’s NPS Vatsalya account before retirement?
Early withdrawals from NPS Vatsalya are subject to certain conditions and penalties. It’s generally recommended to avoid early withdrawals to maximize the long-term benefits of the scheme.
For more information on financial assistance schemes, visit our Financial Assistance page.

